Estimated reading time: 10', implementation takes longer
Introduction
Auphonic is an absolutely great web service to post process just about any audio file you want to throw at it. It audiomagically improves recordings of spoken word and is very popular with podcasters for a reason. The service likes to get some support by donations via flattr, bitcoin, money transfer, credit card or even the evil PayPal. Auphonic is free to use and they’ll shut up and take your money if you want to support them.
To import your source files and to export processed audio, Auphonic supports many external services it can interact with.

I like to use SFTP which is using SSH as transport including authentication and encrypted data transfers.
I wanted to use SmartOS as the server plaform. SmartOS is a hypervisor based on the Illumos project forked from OpenSolaris. You might wonder why I’m not doing this on OS X Server as you’d rightfully would expect from me. Chrooting SSH on OS X is quite a pain and SmartOS also uses ZFS which is not a filesystem available on OS X Mavericks at the time of this writing. (I consider MacZFS deprecated, OpenZFS not yet production ready and ZEVO is abandoned as well as incompatible with Mavericks.)
Preparing a zone
To begin, we’ll start with a fresh SmartOS zone. I went with the current base64 image. 10GB of storage looks ok to me and 128MB RAM seems plenty. zlogin to the fresh zone and update the package manager as usual.
1 2 | |
We’ll be using a separate user and group for auphonic to access the SFTP server, so let’s create those first.
groupadd auphonic
Of course the new user needs a home directory where the audio files shall be stored.
mkdir /home/auphonic
Then we add the user and also assign it to the group we created a moment ago.
useradd -g auphonic -d /home/auphonic -m -s /bin/false auphonic
Of course every user needs a good and long passphrase.
passwd auphonic
Let’s prepare the user’s home directory for SFTP chrooted access, which means we need it to be owned by root or sshd will refuse logins. Of course the auphonic user also needs access to the files which means it would need either be owned by or have group write permissions for auphonic. These requirements conflict each other which we need to solve by adding an ACL.
1 2 | |
The home directory should look something like this now.
1 2 3 4 5 6 | |
Configuring OpenSSH
The preinstalled SunSSH does not support chrooting so we will use OpenSSH for the SFTP server. The OpenSSH package does have support for SMF, so we can comfortably enable, disable and restart the service with svcadm(1M).
1
| |
Before we can actually start and use OpenSSH we need to configure it and generate SSH host keys. Edit /opt/local/etc/ssh/sshd_config with your preferred $EDITOR. These are the things I configured:
Any port above 1024 and other than 22 should be fine. You don’t want to have a public internet facing SSH server running on port 22. This is not a security measure, it only keeps your logs cleaner.
Port 44938
We’re changing the sftp server to the interal one. Find the line that says
Subsystem sftp /opt/local/libexec/sftp-server
and change it to
Subsystem sftp internal-sftp
Since we will use a separate, chrooted user and group for the SFTP server we specify minimum privileges for that group as they don’t need to use a remote shell or otherwise convenient SSH magic. Changing the root directory to ~/ prevents the user from accessing anything else on the server outside their home.
1 2 3 4 5 6 | |
Security considerations
Allowing root login and AgentForwarding is neither necessary nor recommended, so let’s turn that off by setting
1 2 | |
Auphonic’s server will, for the forseable future, connect from one static IPv4 as Georg Holzmann confirmed. They cannot support IPv6 yet, which sadly is quite common in Austria. So we can restrict SSH logins to the IPv4 of Auphonic, the local LAN and other netblocks you expect your users to connect from.
1 2 3 | |
Generating host keys
OpenSSH doesn’t automatically generate host keys for us like you’re probably used to. So we need to generate our own keys. I will use RSA here and I prefer them to be rather long.
1 2 | |
After successful creation you’ll be presented with a shiny new fingerprint which you should make a note of as well as the key’s random art image.
Activating OpenSSH
Now that OpenSSH is installed, configured and secured we can finally turn off SunSSH and enable OpenSSH.
1 2 | |
You can read the log output of sshd with tail -f $(svcs -L openssh) which should give you similar log output to this.
1 2 | |
Testing
From the command line we can now test the sftp connection. Keep in mind that you have to specify the non-standard port and also need to originate from an IPv4 address that is allowed to connect as configured above.
1
| |
Upon first connect you’ll be asked to confirm the host’s fingerprint which you remember from the step before.
Once you’re connected you can verify that chrooting works fine by entering pwd at the sftp prompt and then trying to cd / and pwd again. There shouldn’t be any difference. You can try uploading a file now if you like.
To be sure that you actually cannot get a shell from there try to ssh into the host which should end something like this.
1 2 | |
Great, your OpenSSH server now allows sftp but no ssh logins authenticated by key or interactive password.
Configuring Auphonic external service
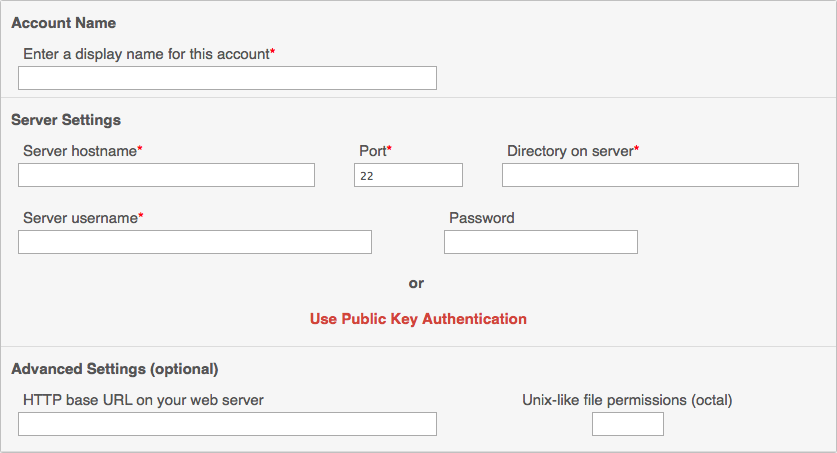
Login to your Auphonic account to create a new SFTP service then select “services” then “SFTP”. You’ll be presented with this form to complete.
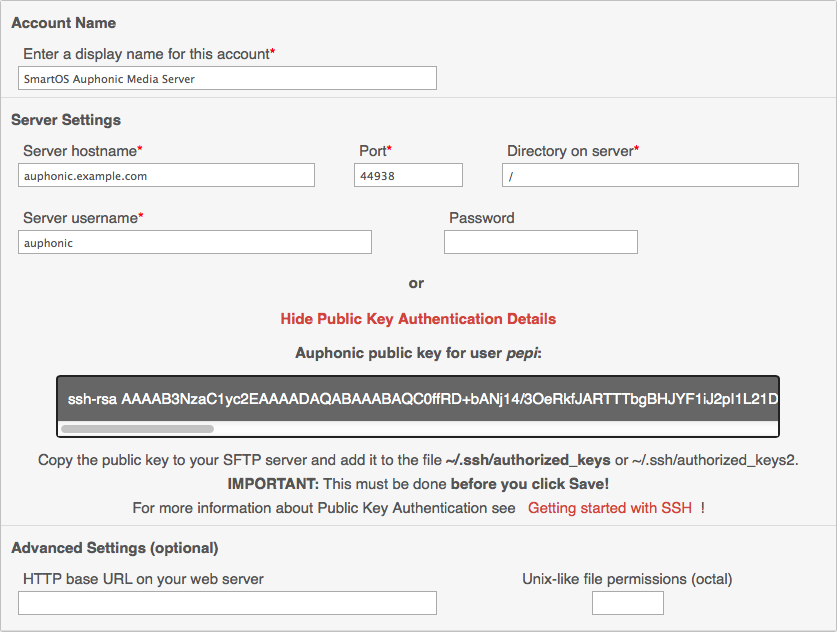
 We’ll simply be filling out the fields. The display name is just what you’ll see as a source in your production so name it anything you like. The server hostname is the DNS name or IP number where Auphonic can contact your server. The port number is prepopulated with the standard ssh/sftp port 22 which we’ll change to 44938. The directory will simply be
 / since we’re chrooting anyway and / simply refers to the auphonic user’s home directory in this case. The username is of course auphonic and we’ll leave the password empty. When done it should resemble this screenshot.

Befor you hit save, klick on the “Use public key authentication” text. You’ll be presented with the public key that Auphonic will use to connect to your SFTP server. Copy the whole text in that box, we need to add that to the authorized_keys on the server before we can save this service.
Back in the SmartOS zone, edit ~auphonic/.ssh/authorized_keys. In case the directory ~/.ssh doesn’t exist yet, you need to mkdir it. Paste the Auphonoc public key into the file and at the end of the line add a space and then yourAuphonicUsername @auphonic.com. That way you will know which public key belongs to whom should you have several public keys in there. This will happen if you use this server for multiple Auphonic accounts, each of which will give you a separate public key to use. You can also authenticate your users that way where you also should add a comment at the end so you know which key belongs to which user in case you need to revoke access at some time in the future.
Once you’re done adding the Auphonic public key and have saved the authorized_keys file you can hit save on the Auphonic website to add your external service. Auphonic will test the connection and balk at you in case something goes wrong. Only properly working server connections can be added. Configuring your firewall and probably necessary port forwardings are out of the scope of this article and are left as an exercise to you.
Configuring an SFTP client application
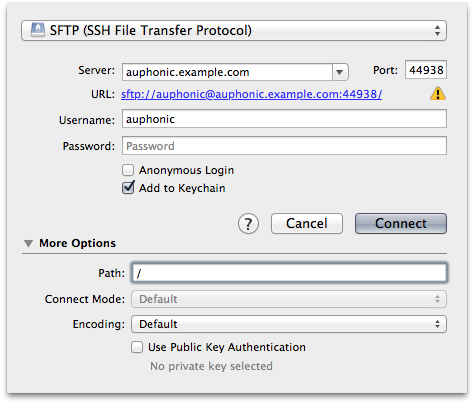
You’ll likely use a graphical application to upload source files, unless you’re like me and use sftp from the command line. Many people rightfully like to use Cyberduck. Setting up your connection there looks like this:
 You can use password authentication here if you like, but it would be better to use public key authentication here as well. Don’t forget that you have to add that public key to the
 ~/.ssh/authorized_keys file as well. Just like you did with the Auphonic public key.
That’s it, you’re done with your shiny SFTP media source for Auhonic. Have fun with your audio productions! If you found a bug in my guide, please contact me so I can fix them.
